서론
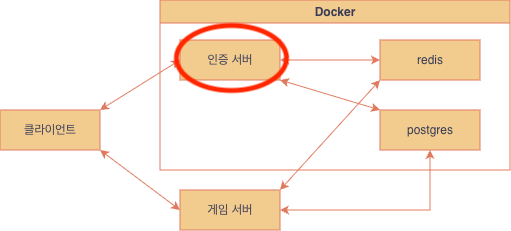
이전 글에서 끝내지 못한 목표를 마무리하자.
거기에 추가로 vscode로 도커 컨테이너에 접속해서 코딩해보자.
목표
- 도커로 데비안 컨테이너 띄우기 ✅
- 간단한 c++ 프로그램 빌드, 실행해보기 ✅
- 인증서버에서 사용할 라이브러리들 설치 및 동작 확인하기 ☑️
- 도커파일, 컴포즈파일로 환경 구성 반 자동화 하기 ☑️
- vscode로 도커 컨테이너 접속하기 ☑️
적어놓은 순서대로라면 라이브러리 동작 확인이 먼저지만, 그걸 하려면 도커파일과 도커 컴포즈파일 세팅을 해놓으면 편하니 4번항목 먼저 해결해보자.
도커파일 세팅
이전에 debian:trixie를 그대로 컨테이너로 올린 뒤에 컨테이너 안에서 이것저것 설치했었다. 하지만 이렇게 하면 컨테이너를 삭제하면 설치했던 패키지들도 싹 날아가서 다음에 컨테이너를 올리면 처음부터 다시 세팅해야한다. 그걸 방지하기 위해 도커파일을 사용해 debian:trixie에 필요한 패키지들을 싹 설치해놓은 전용 이미지를 하나 만들어서 앞으로는 새 이미지로 컨테이너를 띄우자.
Dockerfile
FROM debian:trixie
RUN apt update && \
		apt install -y \
		vim \
		make \
		gcc \
		g++  \
		libhiredis-dev \
		libpq-dev \
		protobuf-compiler \
		libprotobuf-dev
WORKDIR /home
docker build -t mydebian .. 현재폴더에 있는 도커파일로 -t mydebian 이미지 만들기

이미지들을 확인해보면 mydebian이 생성됐다.
redis, postgres도 Pull 해놓자.
도커컴포즈 세팅
compose.yml
services:
  dev:
    image: mydebian
    volumes:
      - ./volume:/home
    ports:
      - "4242:4242"
    environment:
      HOME: /home
      CPATH: /usr/include/hiredis:/usr/include/postgresql
    tty: true
  postgres:
    image: postgres:17.8
    ports:
      - "5432:5432"
    environment:
      POSTGRES_PASSWORD: password
  redis:
    image: redis:8.2.4
    ports:
      - "6379:6379"
dev
/home을 volume으로 설정해서 컨테이너 안에서 작업한 내용이 날라가지 않도록 하자.
./volume은 내 컴포즈파일 있는곳에 있는 폴더이름이다. 그냥 내가 여기다 저장하고싶어서 설정했다.
나중에 클라이언트 접속 받는 테스트도 할테니 포트는 미리 열어놨다
postgres
postgres는 기본포트가 5432다.
db에 있는 데이터를 날려먹지 않으려면 여기도 볼륨설정을 해야하는데, 어차피 지금은 아무것도 없으니 그냥 설정하지 않았다.
redis
redis는 기본포트가 6379다. 마찬가지로 접속테스트만 할 예정.
레디스는 어차피 휘발성 데이터를 담는 용도라 볼륨설정은 하지 않는다.
이제 docker compose up 명령어만으로 3개의 컨테이너를 바로 띄우고 네트워크로 연결까지 된다!
컨테이너를 내릴때는 docker compose down 을 입력하면 된다.
docker compose up -d
잘 켜진다.
인증서버에서 사용할 라이브러리들 동작 확인하기
postgres
저번에 썼던 예시코드를 그대로 main.cpp에 붙여넣자.
/*
 * src/test/examples/testlibpq.c
 *
 *
 * testlibpq.c
 *
 *      Test the C version of libpq, the PostgreSQL frontend library.
 */
#include <stdio.h>
#include <stdlib.h>
#include "libpq-fe.h"

static void
exit_nicely(PGconn *conn)
{
    PQfinish(conn);
    exit(1);
}

int
main(int argc, char **argv)
{
    const char *conninfo;
    PGconn     *conn;
    PGresult   *res;
    int         nFields;
    int         i,
                j;

    /*
     * If the user supplies a parameter on the command line, use it as the
     * conninfo string; otherwise default to setting dbname=postgres and using
     * environment variables or defaults for all other connection parameters.
     */
    if (argc > 1)
        conninfo = argv[1];
    else
        conninfo = "dbname = postgres";

    /* Make a connection to the database */
    conn = PQconnectdb(conninfo);

    /* Check to see that the backend connection was successfully made */
    if (PQstatus(conn) != CONNECTION_OK)
    {
        fprintf(stderr, "%s", PQerrorMessage(conn));
        exit_nicely(conn);
    }

    /* Set always-secure search path, so malicious users can't take control. */
    res = PQexec(conn,
                 "SELECT pg_catalog.set_config('search_path', '', false)");
    if (PQresultStatus(res) != PGRES_TUPLES_OK)
    {
        fprintf(stderr, "SET failed: %s", PQerrorMessage(conn));
        PQclear(res);
        exit_nicely(conn);
    }

    /*
     * Should PQclear PGresult whenever it is no longer needed to avoid memory
     * leaks
     */
    PQclear(res);

    /*
     * Our test case here involves using a cursor, for which we must be inside
     * a transaction block.  We could do the whole thing with a single
     * PQexec() of "select * from pg_database", but that's too trivial to make
     * a good example.
     */

    /* Start a transaction block */
    res = PQexec(conn, "BEGIN");
    if (PQresultStatus(res) != PGRES_COMMAND_OK)
    {
        fprintf(stderr, "BEGIN command failed: %s", PQerrorMessage(conn));
        PQclear(res);
        exit_nicely(conn);
    }
    PQclear(res);

    /*
     * Fetch rows from pg_database, the system catalog of databases
     */
    res = PQexec(conn, "DECLARE myportal CURSOR FOR select * from pg_database");
    if (PQresultStatus(res) != PGRES_COMMAND_OK)
    {
        fprintf(stderr, "DECLARE CURSOR failed: %s", PQerrorMessage(conn));
        PQclear(res);
        exit_nicely(conn);
    }
    PQclear(res);

    res = PQexec(conn, "FETCH ALL in myportal");
    if (PQresultStatus(res) != PGRES_TUPLES_OK)
    {
        fprintf(stderr, "FETCH ALL failed: %s", PQerrorMessage(conn));
        PQclear(res);
        exit_nicely(conn);
    }

    /* first, print out the attribute names */
    nFields = PQnfields(res);
    for (i = 0; i < nFields; i++)
        printf("%-15s", PQfname(res, i));
    printf("\n\n");

    /* next, print out the rows */
    for (i = 0; i < PQntuples(res); i++)
    {
        for (j = 0; j < nFields; j++)
            printf("%-15s", PQgetvalue(res, i, j));
        printf("\n");
    }

    PQclear(res);

    /* close the portal ... we don't bother to check for errors ... */
    res = PQexec(conn, "CLOSE myportal");
    PQclear(res);

    /* end the transaction */
    res = PQexec(conn, "END");
    PQclear(res);

    /* close the connection to the database and cleanup */
    PQfinish(conn);

    return 0;
}
빌드 후에 프로그램 인자로 아래와같이 넣어서 postgres 컨테이너와 통신이 잘 되는지 확인하자.
여기서 host=postgres의 postgres는 도커 컴포즈 서비스 이름이다.
./test "host=postgres user=postgres password=password"
뭐가 잔뜩 출력되는데 아무튼 lpg 라이브러리를 사용한 코드가 postgres 서버와 성공적으로 통신했다!
redis
저번에 썼던 예시코드에서 첫줄 redisConnect("127.0.0.1", 6379); 를 redisConnect("redis", 6379); 로 변경해준다 "redis"는 도커 컴포즈 서비스 이름이다.
#include <stdio.h>
#include <stdlib.h>

#include <hiredis/hiredis.h>

int main() {
    // The `redisContext` type represents the connection
    // to the Redis server. Here, we connect to the
    // default host and port.
    redisContext *c = redisConnect("redis", 6379);

    // Check if the context is null or if a specific
    // error occurred.
    if (c == NULL || c->err) {
        if (c != NULL) {
            printf("Error: %s\n", c->errstr);
            // handle error
        } else {
            printf("Can't allocate redis context\n");
        }

        exit(1);
    }

    // Set a string key.
    redisReply *reply = (redisReply*)redisCommand(c, "SET foo bar");
    printf("Reply: %s\n", reply->str); // >>> Reply: OK
    freeReplyObject(reply);

    // Get the key we have just stored.
    reply = (redisReply*)redisCommand(c, "GET foo");
    printf("Reply: %s\n", reply->str); // >>> Reply: bar
    freeReplyObject(reply);

    // Close the connection.
    redisFree(c);
}
빌드후에 실행시켜보자.
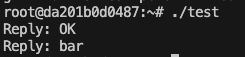
lhiredis 라이브러리를 사용한 코드가 redis 서버와 성공적으로 통신했다!
지금 보면 특정 컨테이너에서 돌아가고있는 서버와 접속하는데 왜 도메인네임은 컨테이너 이름이 아니라 서비스 이름일까?
서비스는 같은 서비스를 여러 컨테이너 띄울 수 있기 때문에 2개 이상의 같은 서비스 컨테이너가 띄워진다면 하나의 도메인네임으로 접속이 어떻게 되는걸까?
그래서 알아봤더니 이렇다고 한다.
- server 서비스를 여러 개로 늘리면
- server 라는 이름은 하나의 IP가 아니라 여러 IP 목록을 가지게 된다.
- 그리고 Docker 내부의 DNS는 라운드 로빈 방식(공평하게 돌아가는 방식)으로 하나를 골라서 반환한다
vscode로 도커 컨테이너 접속하기
게시글에는 남기지 않았지만 지금까지는 대충 볼륨에다가 모든 c파일을 몰아넣고 mac의 volume위치에서 vscode를 열어 코드를 수정하고, 터미널을 쓸때는 항상 docker exec .... 로 컨테이너에 들어가서 작업을 했다. 이런 방법은 문제가 많은데 일단 vscode가 volume디렉토리 밖의 파일은 전혀 인지하지 못하기 때문에 라이브러리 헤더나 함수에 죄다 빨간줄이 뜬다. 거기에다가 매번 터미널 들어가는것도 귀찮고.
그래서 아예 vscode에서 터미널에 접속하는 방법을 사용하기로 했다.
1. vscode 확장에서 remote development 검색 및 설치

2. 원격 탐색기 탭 열기
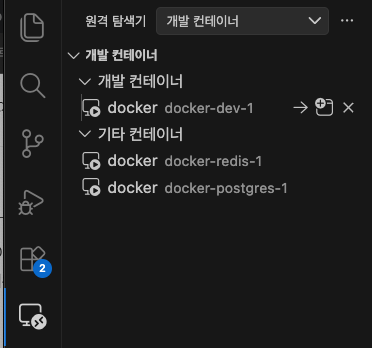
3. 접속하려는 컨테이너 우클릭하고 연결하기
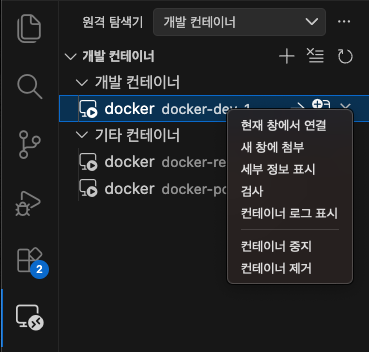
그러면 docker server라는게 자동으로 설치되고, 어떤 디렉토리를 열것인지 입력하는 창이 뜬다. (두번째엔 안뜨네?)

연결도 잘 됐고, vscode에서 터미널도 새로 열어보면 컨테이너의 bash를 사용중이다.
'프로젝트 > Project_Island' 카테고리의 다른 글
| 5. WriteBuffer와 Send작업 (0) | 2026.03.02 |
|---|---|
| 4. epoll기반 서버 기초다지기 (0) | 2026.03.01 |
| 3. 인증서버 설계를 위한 공부 (0) | 2026.02.21 |
| 1. Docker 기반 Debian 개발환경 구축(1) (0) | 2026.02.20 |
| 0. 포폴용 게임을 만들어보자! (0) | 2026.02.20 |